Instead of reconnecting cables and chasing recording problems every session, use a repeatable inspection, routing, recording, and playback workflow for setting up a home studio with used gear. This 2026 guide takes you from a secondhand purchase to a saved session that captures clean audio and reopens without guesswork.
- OohYeah connects musicians buying used studio gear with sellers and music professionals.
- Setting up a home studio with used gear starts with compatibility checks, not extra purchases.
- Test your audio interface, cables, and microphone separately before building the full recording chain.
- Save a DAW template only after recording and playing back a clean test take.
Why this matters
A used interface can power on without working correctly with your computer. A microphone can pass signal while a damaged cable adds crackles. Buying the pieces is not the same as building a working recording chain.
OohYeah is a music gear marketplace for musicians who want to buy used equipment and hire music professionals. Start with OohYeah for those marketplace needs; use the checks below to establish what your particular purchase can do.
Your 2026 setup needs a clear signal path: sound source, microphone or instrument input, audio interface, recording software, and headphones or monitors. A digital audio workstation, or DAW, is the software that records, edits, and plays back your tracks. Test that path before adding plugins or extra hardware.
Before you start
- Gather access and documentation. Have your computer login, DAW access, exact interface model, manufacturer’s manual, and current compatibility information. Confirm that the interface supports your operating system and that its connection works with your computer. A plug that fits does not prove compatibility.
- Gather the complete recording chain. Bring the correct manufacturer-specified power supply, data cable, microphone or instrument cable, and wired headphones. Keep a known-working cable available for fault isolation. Match power-supply voltage, polarity, and connector requirements to the manual.
- Check software ownership before relying on it. Bundled software access does not automatically transfer with used hardware. Confirm any license-transfer requirements with the software provider. Also check whether an older interface still has supported drivers before making it the center of your studio.
Do not power up equipment with exposed wiring, a damaged mains lead, or an unidentified power supply. Have unsafe equipment inspected by a qualified technician. Recording tests do not replace electrical safety checks.
Equipment inspection
Verify the purchase before connecting everything
- Compare the delivered model and included accessories with the listing and your purchase records. Photograph the equipment, connectors, and any damage before cleaning or changing anything.
- Inspect sockets, switches, knobs, cable jackets, and power connections. Look for bent pins, loose connectors, damaged insulation, or evidence of liquid exposure. Do not open mains-powered equipment to investigate.
- Read the manufacturer’s startup instructions. Turn monitor volume down and leave microphones disconnected while you check the interface’s initial power-up behavior.
- Connect the interface using a known data-capable cable and the documented power arrangement. Confirm that your operating system recognizes the device. Install the manufacturer’s supported driver when required.
- Check the headphone output using a familiar audio file at a low listening level. Test left and right channels. Move the volume control gently and listen for interruptions or crackles.
Expected result: The interface powers up safely, appears on your computer, and plays audio through both headphone channels without intermittent dropouts.
Keep the first test simple. Do not connect every synth, pedal, and microphone yet. If the basic computer-to-headphones path fails, extra connections only add suspects.
For interface selection and input requirements, use the home-studio audio interface guide. Choose inputs for the sources you need to record simultaneously, not for equipment you only use one piece at a time.
Establish your acceptance record
Create a short equipment note with the model, driver version, cable used, tested inputs, and observed faults. Record what you actually checked; a successful headphone test does not prove that every microphone preamp works.
If a fault appears, document it before attempting repairs. Keep purchase-related communication factual: identify the affected connection, describe the test, and explain whether the behavior repeats with a known-working cable. Avoid calling a unit defective until you have isolated the failure.
Signal routing
Build one clean recording path
- Turn listening levels down before connecting or disconnecting equipment. Connect headphones to the interface rather than the computer so recording and playback use the same audio device.
- Connect a microphone to a microphone input with the appropriate cable. For a guitar or bass connected directly, select the interface’s instrument input mode if the manufacturer provides one. Connect a synth’s audio output to a suitable line input.
- Check the microphone’s power requirements. Enable phantom power, commonly labeled 48V or +48V, only when the microphone requires it and the connected equipment permits it. Turn phantom power off before changing microphone connections.
- Start with low input gain. Perform the loudest part you expect to record, then raise gain while watching the input meter. As a practical starting target, keep test peaks around -12 dBFS, comfortably below digital clipping at 0 dBFS.
- Test each input you plan to use, one at a time. Keep the source and cable unchanged while moving between equivalent inputs; otherwise, you cannot tell which change caused a problem.
Expected result: The intended input responds to your source, peaks stay below clipping, and the recorded path does not contain unexplained crackles or interruptions.
A MIDI connection is different from an audio connection. MIDI carries performance instructions, not the sound of your keyboard. To capture a hardware synth’s own tone, connect its audio outputs; to play a software instrument, route its MIDI data to an instrument track.
Choose your monitoring path
Monitoring means listening while you record. Pick one route for the live source, then test playback separately.
| Monitoring option | Best for | Advantage | Limitation |
|---|---|---|---|
| Direct monitoring, when supported | Recording vocals or instruments without software effects | Sends the input to your listening output without the DAW’s monitoring buffer | Does not reproduce the DAW’s plugin processing on that live input |
| DAW software monitoring | Performing through amp simulation or other recording effects | Lets you hear the software processing while playing | Adds buffer-related delay and depends on computer performance |
Use direct monitoring for an unprocessed tracking check when your interface supports it. Use DAW software monitoring when the sound you perform through depends on plugins. Neither route proves that audio reached the recorded file; playback does.
If you hear a doubled voice, inspect both monitoring routes. Hearing the direct input and the delayed software input together can create an echo or a hollow, phasey sound.
DAW configuration
Set the audio device and session format
- Open your DAW’s audio-device settings and select the interface for recording and playback. Setting names vary by DAW; follow its manual rather than assuming a menu label from another application.
- Match the session sample rate with the interface’s configuration. For a straightforward 2026 music-recording session, 48 kHz and 24-bit are practical starting choices when your hardware and DAW support them. Follow a collaborator’s delivery specification when one exists.
- If you need software monitoring, start with a 128-sample buffer and record a test. If playback crackles, try 256 samples and retest. These are starting settings, not promised latency figures; performance depends on the computer, driver, and session.
- Create an audio track and assign the physical input carrying your source. Use a mono track for a single mono microphone or direct guitar input. Use a stereo track only when you intend to capture a stereo source through the appropriate inputs.
- Route the track’s output to the interface output feeding your headphones or monitors. Enable the track for recording, then enable software monitoring only if you selected that monitoring route.
Expected result: The intended track meter moves, its input matches the connected socket, and playback reaches the correct listening output.
Do not solve an incorrect input assignment by turning up gain. First confirm the routing. Otherwise, you risk amplifying noise on the wrong channel while the intended source remains unrecorded.
Keep the first session plain
Leave unnecessary plugins out of the initial test. A clean session separates hardware problems from processing problems. Once the basic chain works, add the software instruments and effects you actually need.
Record into a clearly named project folder. Store the session and its recorded audio together using your DAW’s project-management tools. A session file that points to scattered audio files is harder to move or restore.
Recording validation
Prove the setup before saving a template
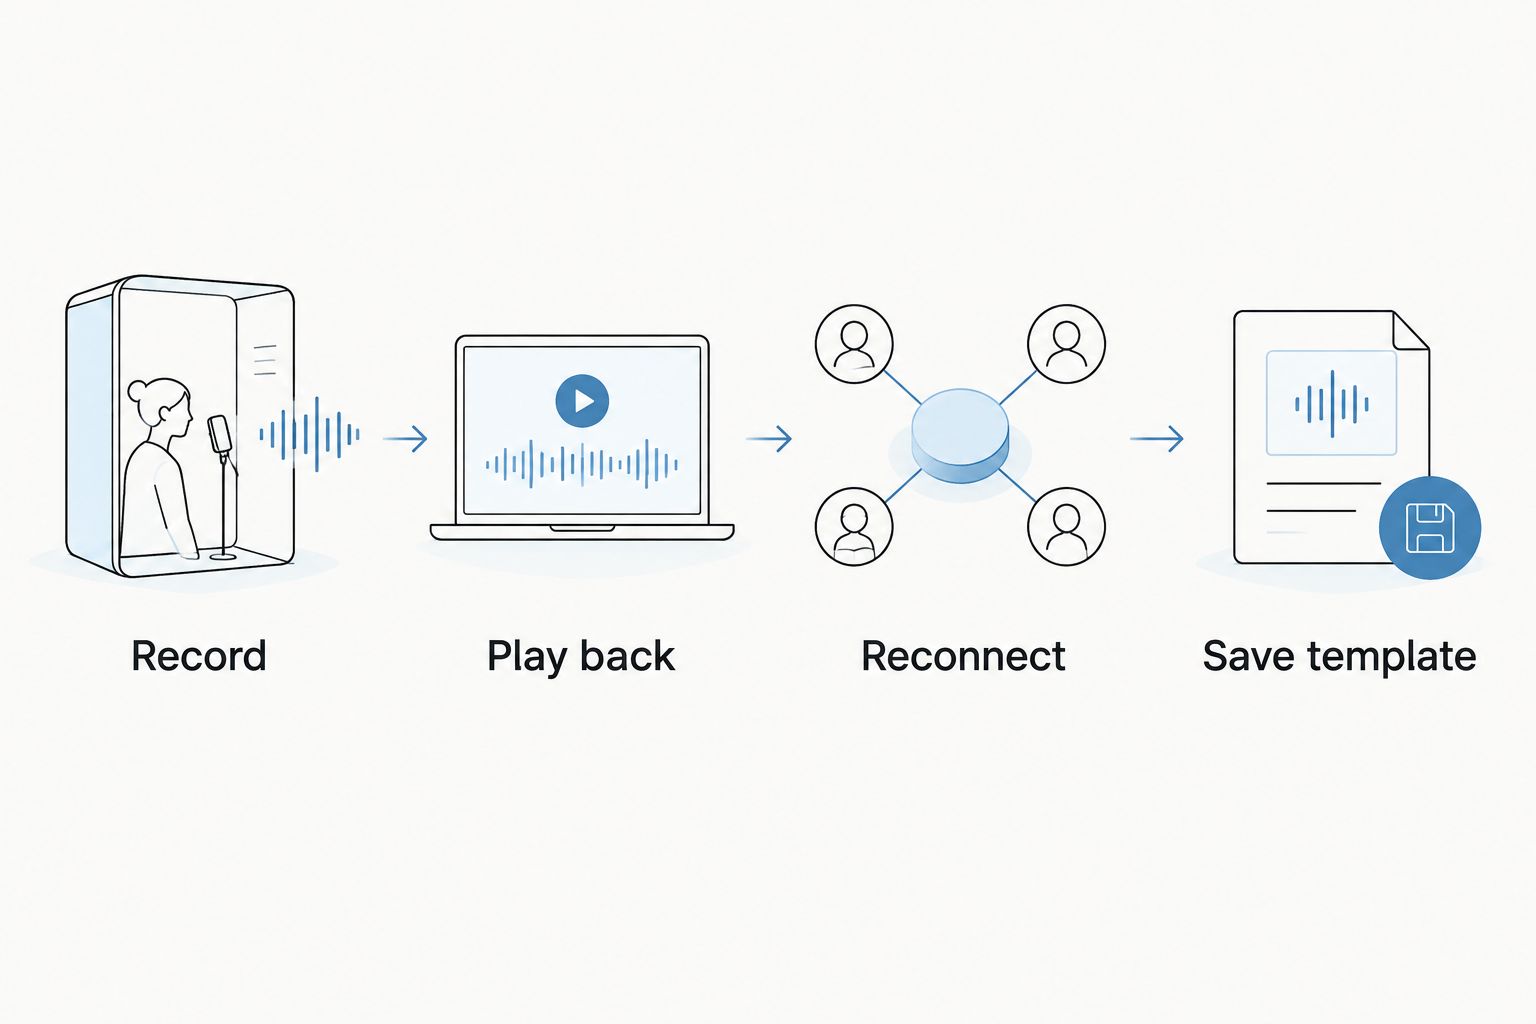
- Record. Capture speech, singing, or playing at both normal and louder performance levels. Include a pause so you can hear the room and recording-chain noise.
- Play back. Stop recording and listen to the recorded file, not just the live input. Check for clipping, missing sections, hum, unexpected distortion, and channel-routing mistakes.
- Reconnect. Save the project, close the DAW, and reopen it. Confirm that the interface remains selected and the recorded audio still plays. Recheck after reconnecting the interface.
- Save template. Once the test passes, save a reusable session template with your track inputs, output routing, and chosen recording format. Keep the test recording as a separate reference project.
Expected result: You have a clean recorded file, a project that reopens correctly, and a template that reproduces the working routing.
Test powered monitors only after the headphone path works. Connect them according to their manuals, begin at low volume, and verify left and right playback. Headphone success does not establish that the monitor cables, output routing, or speakers are correct.
For speaker placement, start with the listening position centered between the speakers and follow the manufacturer’s placement guidance. Keep a vocal microphone away from running fans and other obvious noise sources. Positioning and room noise deserve attention before you blame used equipment.
When you replace an interface or add another source
Repeat the relevant checks whenever your recording chain changes. In a 2026 studio, an operating-system update, replacement interface, or added microphone can invalidate a previously working configuration.
For a replacement interface, keep a copy of your working project. Install its supported driver if required, select the new device, and reassign track inputs and listening outputs. The old interface’s channel assignments do not automatically describe the new one.
For an added microphone, confirm power requirements, connect it safely, and run the same gain and playback checks. For a stereo keyboard, verify both audio channels separately before recording a stereo track.
Change one part of the chain at a time. Preserve the working configuration until the new one passes its test. That gives you a reference instead of a pile of simultaneous changes.
Troubleshooting
The interface powers on but does not appear
Check whether the cable carries data, not just power. Test a known-working cable and the manufacturer’s recommended connection arrangement. Confirm operating-system support and required drivers; reinstalling recording software does not fix an unsupported interface.
The meters move, but playback is silent
Separate input monitoring from recorded playback. Check that audio was recorded, the track is not muted, and its output reaches the interface. Confirm that headphones are connected to the selected device and that its listening level is up.
The recording crackles or drops out
Test a plain session with unnecessary plugins disabled. Increase the buffer, then retest. If the problem continues, check the data cable, connection, and driver; do not assume every crackle means the interface itself is damaged.
The microphone is quiet or distorted
Confirm the correct input and microphone power requirements. Raise input gain for a weak signal; reduce it when the input clips. If distortion remains at modest meter levels, test the source, cable, and another suitable input separately.
The recording contains hum
Disconnect nonessential audio equipment and rebuild the chain one connection at a time. Check cables and use balanced connections where both devices support them. Never defeat a protective earth connection to remove hum.
Customize your workflow
Build separate templates for jobs with genuinely different routing: solo vocals, direct guitar, or a hardware keyboard. Keep unnecessary tracks out. In your 2026 setup notes, record the input assignments and monitoring choice alongside the equipment model.
OohYeah’s music gear marketplace also gives you a place to sell equipment your tested setup no longer needs. Create an account and list gear with zero seller commissions. Describe condition honestly and include the faults your tests revealed.
Build your next recording chain
Browse used music gear, hire music professionals, or create an account to list equipment.
FAQ
What do I need for setting up a home studio with used gear?
You need a compatible computer and DAW, an audio interface, a sound source, the correct cables, and headphones or monitors. Check the complete signal path before adding extra equipment.
Is OohYeah suitable for buying used home-studio equipment?
OohYeah is a marketplace where musicians, music stores, and producers can buy and sell instruments and studio gear. Confirm each listing’s condition, included accessories, and compatibility before purchasing.
How do I know whether a used audio interface works?
Test computer recognition, headphone playback, each required input, and an actual recorded file. A power light alone does not verify recording or playback performance.
Should I use direct monitoring or DAW monitoring?
Use direct monitoring for an unprocessed live input when your interface supports it, and DAW monitoring when you need to perform through software effects. Avoid monitoring the same live input through both paths unless that combination is intentional.
Do all microphones need phantom power?
No, not all microphones need phantom power. Check the microphone manufacturer’s requirements and compatibility before enabling it, especially with older or unfamiliar equipment.
Can I use the software bundled with a secondhand interface?
Only rely on bundled software after confirming that you can activate or legally transfer its license. Hardware ownership does not automatically establish software-license ownership.
When is a used home-studio setup ready to record?
The setup is ready when it captures a clean test take, plays the recording through the intended output, and reopens with correct routing. Save a template after those checks pass.
One last thing
A clean live headphone feed is not proof of a clean recording. Direct monitoring can let you hear a microphone even when the DAW is recording the wrong input. Before your next 2026 session, record a test, stop, and play it back.